css templates

Finshing Touches for Your New African Djembe, Add A Rope Handle

First, get all your extra rope secure and out of the way, with this Chain Stitch Method!

Mobirise

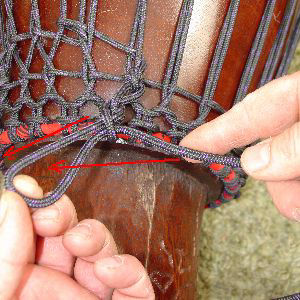
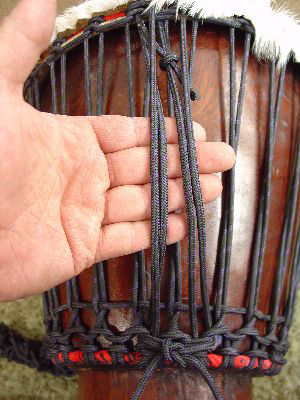
Chain Stitch Your Extra Rope

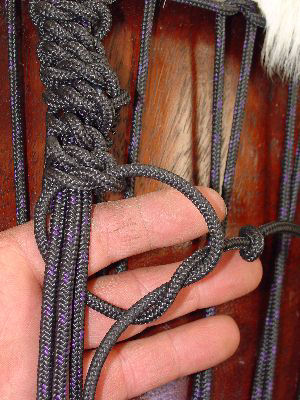
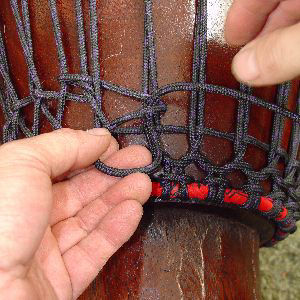
Here is where we finished the drum. I never tie the diamond row off anymore. If you leave a weave knot threaded and snugged down it won't come loose. To begin the chain stitch with your extra rope, first make a twist to form a loop. 
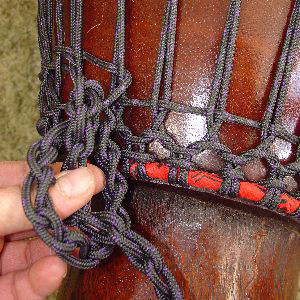
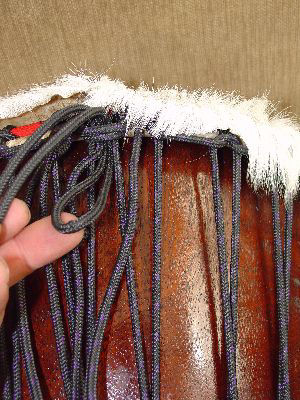
Mobirise

Push a Loop Through

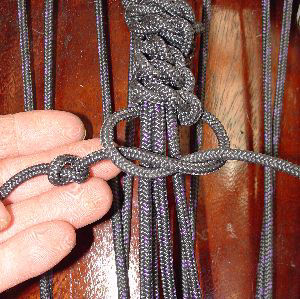
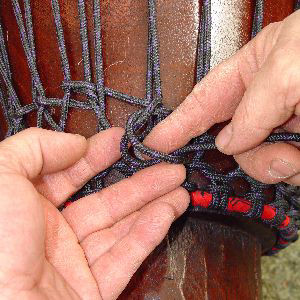
Now push through the twisted loop, another loop of rope. With your left hand you will grab the side of the loop toward the top of your drum and pull that at the same time working the loop snug up to your drum.
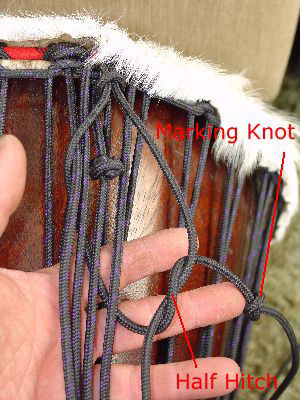
Mobirise

Tighten First loop

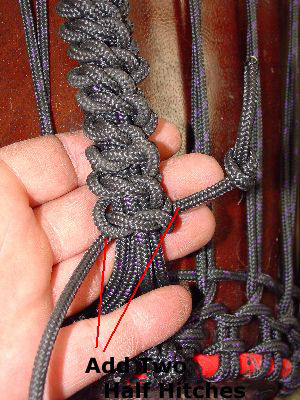
The twisted loop is now tight to the drum and the loop you pushed through is now the loop. Look at my hand positions. My left index and thumb grasp the uphill side of the rope, I keep tension away from the drum body and snug the loop up by pulling slightly away from the drum. My left center finger can enlarge the loop by closing toward my palm, spreading the loop. My right hand is the "regulator", It can shrink the loop if it gets to big by pulling backward.

Mobirise

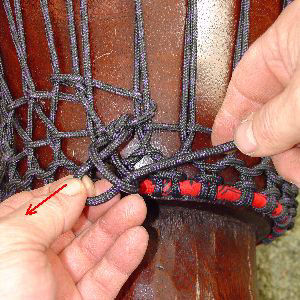
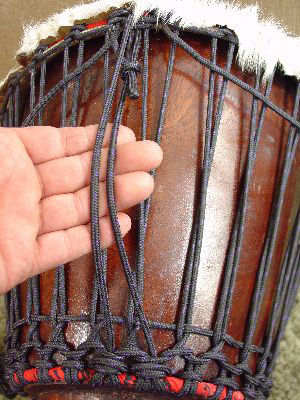
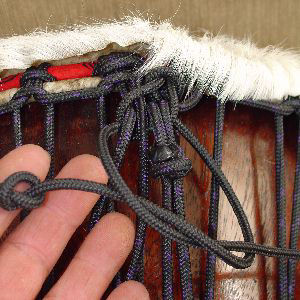
Push Another loop Through

I have just released the loop with my left hand and as I pushed the rope toward the loop with my right, the left reached through and grabbed the next loop on the uphill side and pulled back, tightening the next loop 

Mobirise

Repeat Process

Again reach though , grab new loop, pull back and snug up with tension on the uphill side of loop, The right hand acts as loop size regulator, and ... 

Mobirise

Get in the Rhythm!

...pushes the new loop toward the last one so the left hand can grab it and pull it through. Once you get the hang of it you can do it as fast as : Grab, Pull, Snug ! Once you get near the end just pull the end right THROUGH the last loop and tighten, That locks it. To undo, you push the end back through the last loop and just pull and all the chain stitches come loose like magic !

Mobirise

Chain Stitch The Chain

Basically this is a crochet chain stitch using your hands as the needles. If you have a lot of rope left it will shorten eight feet of rope into about three feet. as in this photo, you can also then use the chain to make a larger chain.... With this drum I ended with about three feet of chain so just wrapped it very tightly just above the bottom ring and then wrap the end around a vertical rope after you hold the tension on it very tight. It will ride there not blocking the view of your beautiful trumpet, or hiding your nice Mali Weave and out of the way. make a chain of the chain

Mobirise

Make A Rope Handle

First take the ends from the bottom self locking knot, stretch them up and through the center of the top cradle and tie the two pieces with a square knot. Normally I'll tie the knot up top at the cradle but one rope was just a little short so I ran the long one through the top cradle knot and then tied it with the other a little ways down. Leave enough slack so your hand can easily get under the pair.....this begins the skeleton of your handle. 

Mobirise

Four Spine Ropes

Now take the ends from the top ring, and since these are both long enough, I thread them through/under the cradle loops just outside the self locking knot at bottom. You may need to take a needle nose or awl and lift the rope there to slide these under. I have left slack between the drum and these two ropes too. The same amount as the other ropes that I first tied so the if I slide my hand under the four ropes marked red, there is equal space for my hand. This slack should also be enough to lift the top rope ring up level with the playing surface so if you have to re-head your drum someday,you don't have to take off the handle to do it thread and tie the top cradle rope ends to the bottom

Mobirise

Tie them all Off

I have tied the ends at the bottom with a square knot, snug up and tighten the knot.

How do you tie a square knot? Start with crossing the ropes like tying you shoes... right rope over left and back under. Then finish with the opposite...Right rope under left, and back over. When you have it correct the two ropes (one is one rope end, the other the part you are joining)on the left of the knot come out together and angling away from you, the two ropes on the right come out angling toward you from the knot. I also then tie a half hitch in the end of each rope end and snug it up tight to the square knot on each side.

Mobirise

Push Middle Loop Though

I cut a piece of rope what seems absurdly long, about 12 feet will do. I divide in half to find the middle and just like how we started the cradle rope knots on the top ring, I push the loop through the cradle knot loop and the stick both rope ends back through the middle loop. I cut a piece of rope what seems absurdly long, about 12 feet will do.

Mobirise

Ready to Start

The I just snug it down to the cradle rope and I have my two ropes to use as the handle wrap attached...six feet long each 

Mobirise

Add A Half Hitch

Start the handle wrap by slipping one rope under the four rope skeleton and tying a half hitch. Note I have marked one rope with a half hitch to aid me in keeping that rope identified. The marked rope come out of the half hitch on the "drum" side of the knot, where the other end (left) come out facing away from the knot. Snug this half hitch up under the skeleton. Start the Handle wrap

Mobirise

Now in Front

Now I tie a half hitch above the skeleton, and note the marked rope again ends coming out of the hitch toward the drum.

Mobirise

One in Front, One Behind

That is the pattern! a half hitch below, a half hitch above. The key is always tie it so the same rope (marked with a knot) come out of the hitch the same way (on the drum side of hitch. You will discover to do this, all you do is lay that rope under the other when tying the hitch. After the wrap of the half hitch is is still under the other or on the drum side of the knot. I just move the marking knot along as I use up rope.

Mobirise

Pay Attention!

Essentially you are tying square knots with the "skeleton four ropes "inside" the knot. The handle wrap knots can just slide up and down the skeleton so you snug them nice and even and then you can just keep pushing them up the skeleton to make a really dense handle, or leave them looser. 

Mobirise

Finish it Off

I have worked all the way down skeleton to the bottom attachment. The way to finish the handle is to tie a half hitch in each separate rope (you already have one in the marked rope) and work them right up to the last wrapping knot...I usually stop at an under the handle one so these locking hitches are out of the way. Again you either cut close, burn and spit smear the ends or use any excess for tying your special stuff on! 

Mobirise

VOILA  !

Here is the finished drum. You can see the extra diamond rope chain stitched and wrapped neatly around. The handle is extremely functional and a great addition. The only thing I'd have done differently is used a slightly bigger hide so the skin wrapped over and covered the rings completely...so for that flaw it only gets an 8.5 out of 10....well so it goes! As an instrument this drum is excellent, great tuned djembe sound. 


All Done! Now shop for a Professional Mali Djembe!

Address

Hawkdancing Studio
42  1-1/2 St
Clear Lake, WI 54005

Contacts

Email: hdtalktous@gmail.com 
Phone: 715-263-2756