Make sure your drum is ABSOLUTELY DRY before tuning. Two - Three days in a dry environment, or with a fan on it is usually enough!!!
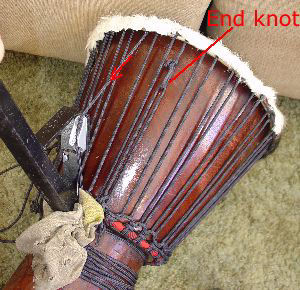
Find your vertical rope end knot, and verify which direction you need to pull from to take all the slack AWAY from the loop. In our case it means work slack out to the left. I start with the second "down rope". That is the left of the pair of ropes through the first cradle knot to the left of the one with the loop knot on the top ring. I use the Rope Wizard but you can use a wooden stick. Begin tightening the vertical ropes
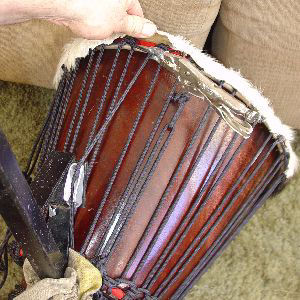
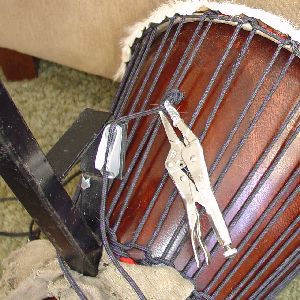
I use a needle nose vise grip with either some duct tape on the teeth, or the teeth dulled with a grinder. Be careful to not scar the rope, or damage the skin at the hide ring. Pinch the cradle rope and the vertical down rope together to lock them against slip.
NOTE: These days I pinch the two adjoining verticle ropes together to hold a pull. It works fine and you don't have to lift the hide, or damage cradle ropes!
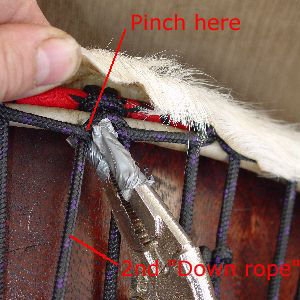
Put just enough tool on to grab the rope. You hold tension on the rope until you get it locked with the vise grips. I often lean forward as I am stradling the trumpet, and tuck the end of the rope wizard under my arm pit. That way I keep tension on the down rope and have two hands free to move the locking pliers. A good quality pliers makes the process much easier. I've tried angle needle nose and stub nose and for me regular needle nose works best. detail
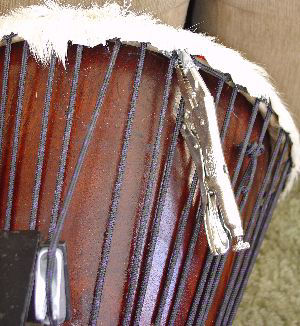
I then leave the pliers on while I move my pry bar, and don't move the locking pliers till I've got tension on the next down rope. Using this method you have NO back slip of the rope at all. The ropes should have been pulled pretty tight when the head was mounted so with the rope wizard you can pull pretty firmly. I can drop the skin about a 1/4 inch with a pull like this. I try to be just darn firm pulling about the first third of the drum so I don't skew the head too much with this powerful tool. the last half I am pulling against already tight rope so I pull about as hard as I can. By the time I am half done this drum sounds good already, a good sign.
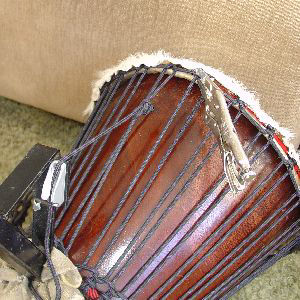
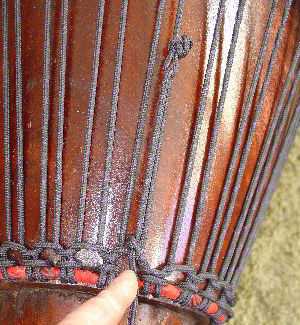
I get these vertical ropes tight in one round. That takes judgment, experience, and this tool. Using a stick you may need to go round twice, and it is easier to keep the head level that way. Now I am back to the end loop and the last pull tightens the rope through that loop knot. tighten the rope at the last loop
Even though I have leverage on my side at this last pull I still use the pliers and lock the rope as it leaves the loop knot. Even starting with tight vertical ropes, I have taken out about 18 inches of slack rope in one round. That saves me a row and a half of tuning diamonds in the Mali weave process
Now I re-tie the half hitch at the bottom and remove the pliers. This drum sounds great right now. If you pluck these vertical ropes they sound like harp strings. Note how the extra rope is right at the very bottom ready to start the Mali weave process. I start moving right with the first pair of ropes away from the loop knot pair. Just a personal preference, left would work too. I save the loop knot for the last in the row to weave.
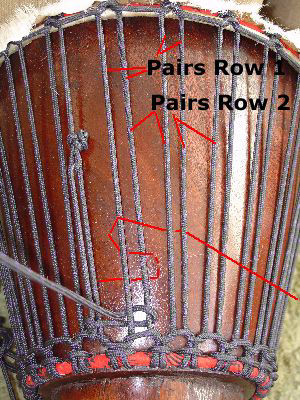
Look at rope pairs here. I always cross the ropes that almost touch as the pass through the same loop of the bottom cradle as pairs for the first row. It does very little tightening, but the row goes fast and easy and stays very low to the bottom cradle. When you are FINDING the pair of ropes you are using ALWAYS look at the top ring. Here the pairs of the whole first row of weave are the two ropes that pass through one cradle knot on the top ring.
Always pull diamonds safely. These first diamond puuls you can just grab the rope and pull, they aren't that hard. As they get harder you can hurt yourself! First protect your hands. Either use a rope gripping tool or gloves, or wrap the rope around a stick and then pull on that as a handle. Rope can really damage hands! Always pull angling down and tangent to the drum. It simply is easier. To protect your arms and back from injury do this: Put the drum on some carpet and sideways against your couch. Rotate the weave you are pulling so the rope is slightly away from you sitting on the floor, and the rope comes right at you on a tangent. Sit in down, put one bare foot near the top ring, and one on the trumpet, pinning the drum so it can't move. Get a hold of the rope as near the weave as possible. You are probably leaning forward, knees bent to do this, like trying to grab your ankles. Now just like rowing a boat you push back with your thigh muscles, lean back with your back, and help out with your arms. Using this method I have seen 100 pound teenage girls with no upper body strength fully tune the largest djembe....and without injury! Being careless or in a hurry I have pulled arm muscles that can take weeks to heal, please be careful !
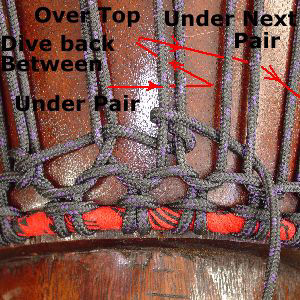
Now you need to learn this tuning mantra:
- Under Pair
- Dive back between
- Over top
- Under next pair.
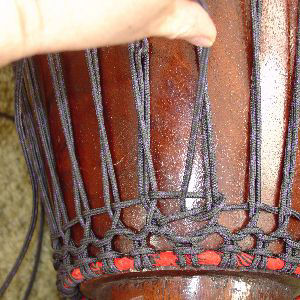
At far left see the vertical rope end half hitch, Next the first pair have been crossed. and the second pair are threaded and ready to be pulled. Always do each mantra part by itself and up near the top ring where there is more room, then slide each part all the way down the pairs as far as it will go as you remove slack and snug up. Always pull down toward the trumpet slightly, at an angle tangent to the drum. This way it pulls easiest and stays neatly as low as possible. Low allows more rows of weave, though if your drum is cranked like this one, you will never finish the second row!
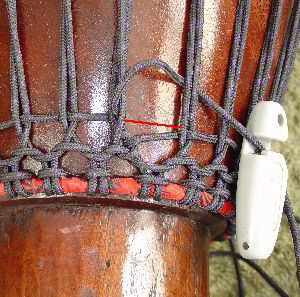
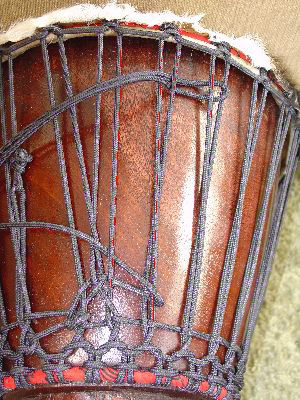
I am all the way around the first row, and have just crossed the loop knot pair (note, I made this easier because I kept the loop up high toward the top ring, and because it has a minimum of knot in the vertical. Where it doubles back to the half hitch at bottom, no worries just treat that double rope as one rope.) Time to start the next row. Ever seen those drums where the weave just spirals up to infinity? Avoid that by finishing the row. Follow across and under the first pair you crossed to make a nice finishing horizontal line (red) all the way around, and finish
Now I find a rope to tuck the Weaving rope under, but back to the left. This finishes and "locks" down the row. Now when I start the second row, I can keep it nice and low, too!
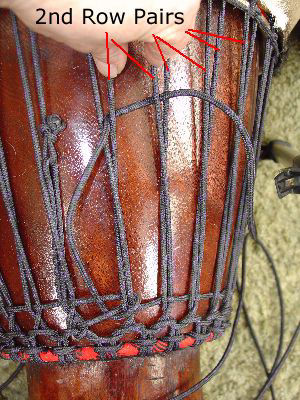
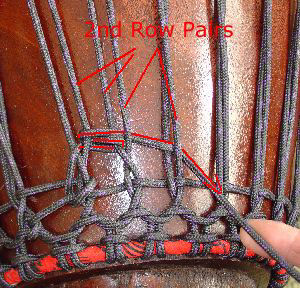
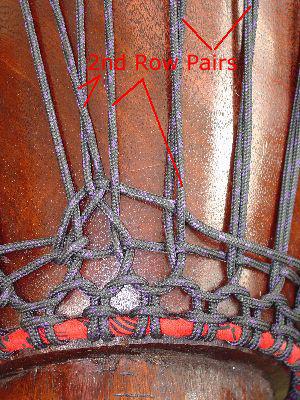
Ok, remember those rope pairs for the Weave? Now we use the ropes that adjoin each other in separate adjoining upper cradle knots for the pair to weave, This row is a little harder as you are threading the rope through and back out of the gaps now narrowed by the first pairs crossing in row one. A needle nose pliers may help here in the threading. If you did a good job tightening the verticals, a few diamonds here and your drum should roar!
Here the "under two" part is snugged down and the rest of the weave mantra is threaded ready to snug down.
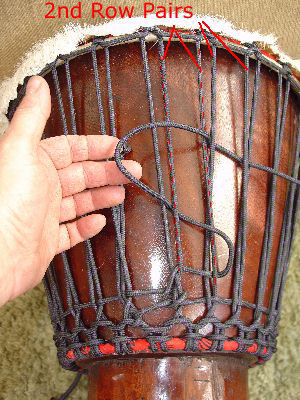
Now the first weave of the second row is ready to pull. Follow the red path... Note how the "under the next pair" looks a little confusing with the far right ropes crossed. If you follow the rope up, you see it is correct. ALWAYS find your pair at the top ring !
The first "Diamond" of the second row is now pulled and the rope is crossed. Look straight down from the crossed ropes and the shape made by the rope below is like a diamond (point up and point down). This is why tuning is called "pulling diamonds".
I have threaded the second diamond. Another trick for rope handling is to use a loop in the middle of your working length for your "needle" instead of the end. It makes for less rope handling.